Windows Installation Instructions
As of version 0.3.1, an URBANopt™ installer (64-bit Windows 7 – 10) is available to install the URBANopt CLI, Ruby, and OpenStudio SDK at the same time. If you’d rather install the dependencies manually, view the manual install section below.
For CLI usage examples, see our Getting Started page
We also have tutorial videos available to guide you through the installation steps.
Install with the URBANopt installer
Follow the steps below or watch the Windows Installer Video.
-
Download the desired version of the installer. For URBANopt versions starting with 1.0.1, you can find installers in the
Assetssection of each URBANopt release on GitHub. Older versions of URBANopt can be found in the URBANopt Amazon S3 bucket. -
Use the GUI installer and choose a directory to install. Once installed, open a terminal and run the provided setup script for that shell (below are the setup scripts for each respective shell environment).
Note: GitBash is recommended
If you are unfamiliar with git or GitBash, you can check out this video tutorial.
GitBash
/c/urbanopt-cli-X.X.X/setup-env.sh
Powershell
powershell -File C:\URBANopt-cli-X.X.X\setup-env.ps1
Windows Command Prompt
c:\urbanopt-cli-X.X.X\setup-env.bat
Important Note Each time you want to work on URBANopt and you open a new terminal to do so, you will need to run the env_uo script to configure your terminal session environment:
GitBash
. ~/.env_uo.sh
Powershell
. ~\.env_uo.ps1
Windows Command Prompt
%HOMEPATH%\.env_uo.bat
Manual Install
Follow the steps below or watch the Windows Manual Installation Video.
-
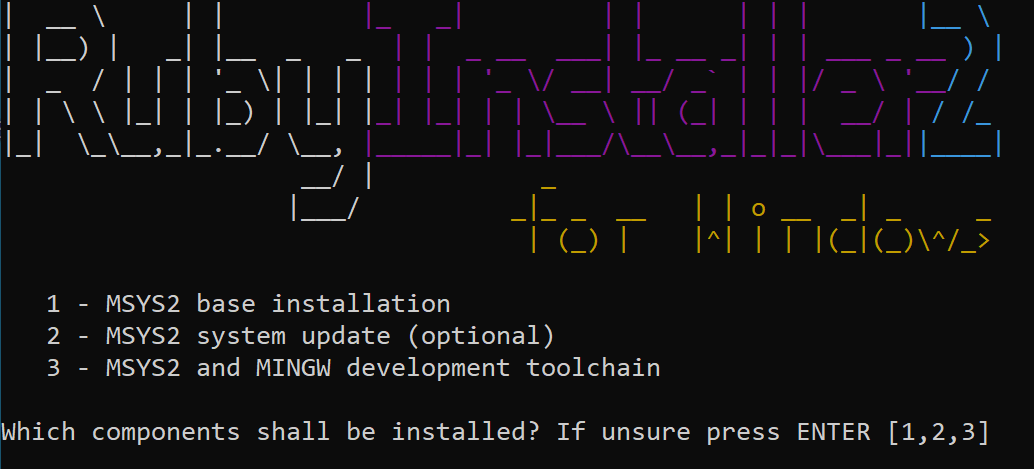
Install Ruby 3.2.2 (x64) with DevKit
Make sure that you select option 3: MSYS2 and MINGW development toolchain during the installation process:
-
Include path to Ruby by adding the following to your environment variables path:
C:\Ruby27-x64\bin -
Create a new environment variable
HOMEand set the variable value to the following:C:\Users\<user_name>Detailed instructions for creating environment variables can be found online.
-
Install Bundler version 2.4.10:
gem install bundler -v 2.4.10 -
Install OpenStudio 3.10.0. The latest URBANopt code uses OpenStudio 3.10.0. Browse the Compatibility Matrix page for additional details.
-
Create file
C:\ruby-3.2.2-1-x64-mingw32\lib\ruby\site_ruby\openstudio.rband edit it to contain the path to your installed OpenStudio (where X.X.X is the OpenStudio version installed):require 'C:\openstudio-X.X.X\Ruby\openstudio.rb' -
Verify your OpenStudio and Ruby configuration:
ruby -e "require 'openstudio'" -e "puts OpenStudio::Model::Model.new"Expected output:
OS:Version, {<long-uuid>}, !- Handle 3.9.0; !- Version Identifier` -
Install the URBANopt Command Line Interface (CLI). This should not take longer than a few minutes. Visit the known issues page if the installation stalls.
gem install urbanopt-cli
URBANopt CLI Usage
-
View available CLI commands with:
uo --help -
For detailed instructions, see the Getting Started page.
URBANopt Python Dependencies
As of version 0.9.0, the URBANopt CLI has integrated 3 python workflows: OpenDSS, DES, and DISCO. To install these python dependencies, a new URBANopt CLI command has been created. The following command will install python and pip as well as the python packages urbanopt-ditto-reader, geojson-modelica-translator, and nrel-disco.
uo install_python
The python installation path will be printed in the terminal once python is successfully installed; you may want to save this path for use in future troubleshooting.
DES Installation
The URBANopt CLI includes District Energy System (DES) support. This functionality is implemented in Python and Modelica and requires additional dependencies before use.
While the GeoJSON Modelica Translator will be installed automatically with the UO CLI install_python command, follow the DES Installation Instructions to install additional dependencies related to this workflow.