Commercial Software Cloud-Based Integration of URBANopt
This page provides documentation to support commercial software cloud-based integration of URBANopt™. Please note that this is only general guidance on scoping potential approaches and that each specific implementation will vary based on the use case, software architecture, etc. Guidance is NOT meant to be exhaustive, and the required approaches/steps/order of implementation can also vary substantially. Also, guidance may change in the future as URBANopt and supporting platform capabilities evolve. Please contact the URBANopt team for specific guidance/questions when scoping potential integration, as well as any recommendations for improving this documentation.
URBANopt has a defined JSON Schema and supporting data files required to run an URBANopt analysis. If you have your own software and would like to integrate URBANopt, development efforts to Extract, Transform, and Load (ETL) URBANopt inputs and outputs should be taken into consideration and planned. Please see the section on preparing URBANopt Project Inputs via an Inputs Translator for guidance on this topic as well as Reading URBANopt Outputs via an Outputs Translator.
Setting up a Cloud/OS Server
The following are a couple of key approaches to consider if you want to run URBANopt in the cloud.
Option 1: Docker-Based URBANopt Execution
For a single-server cloud deployment (for example, an AWS EC2 instance), the simplest and most reproducible approach is to run URBANopt inside a Docker container. This avoids installing URBANopt directly on the cloud instance and makes upgrades, rollbacks, and environment consistency as simple as changing the container tag. Note that this option can also be used on a local computer or HPC server.
In this workflow, URBANopt runs entirely inside a container, while project files and simulation outputs live on the host filesystem.
URBANopt CLI commands and workflows are unchanged. You will still use familiar commands such as uo create, uo run, uo process, and related workflows — the only difference is that these commands are executed inside the container rather than directly on the host operating system.
Note on cloud costs
URBANopt simulations can be CPU- and disk-intensive. Be sure to stop or terminate cloud instances when simulations complete to avoid unnecessary charges.
Step 1: Launch a Cloud Instance
Launch a Linux-based instance on your preferred cloud platform:
- AWS EC2
- Azure Virtual Machines
- Google Compute Engine
- On-premise or HPC cloud nodes
Recommended configuration
- Ubuntu 22.04 LTS
- Adequate CPUs for parallel simulations
- Sufficient disk space for OpenStudio/EnergyPlus outputs
Step 2: Connect via SSH
Once the instance is running, get its IP address and connect a terminal to it using SSH:
ssh user@your-instance-ip
All remaining steps are performed inside this SSH session.
Step 3: Install Docker
Most cloud instances do not include Docker by default, so make sure that it is installed so you can run the URBANopt docker container.
On Ubuntu 22.04:
sudo apt-get update
sudo apt-get install -y docker.io
sudo systemctl enable docker
sudo systemctl start docker
To allow running Docker without sudo, add your user to the docker group:
sudo usermod -aG docker $USER
newgrp docker
Log out and back in if Docker commands still require sudo.
Managed container services (AWS ECS, AWS Batch, Kubernetes) already include Docker and do not require this step.
Step 4: Obtain Your URBANopt Project Files
This guide assumes your URBANopt project is stored in a Git repository and can be cloned onto the instance:
git clone https://github.com/your-org/your-urbanopt-project.git
cd your-urbanopt-project
Other transfer methods (for example, SCP, rsync, or cloud storage downloads) may also be used.
Step 5: Pull the URBANopt Docker Image
URBANopt is provided as a prebuilt Docker image on Docker Hub. For example, version 1.1.0 is named:
nrel/docker-urbanopt:1.1.0
To pull the URBANopt 1.1.0 image locally to the instance, execute the following command:
docker pull nrel/docker-urbanopt:1.1.0
Step 6: Run URBANopt Using Docker
Run the URBANopt container and mount the project directory into the container, so that URBANopt CLI has access to the project files.
docker run --rm -it \
  -v "$(pwd):/work" \
  nrel/docker-urbanopt:1.1.0 \
  uo run -f example_uo/example_project.json \
         -s example_uo/baseline_scenario.csv
Notes
docker runstarts a new container from a Docker image.--rmautomatically removes the container after it exits (optional).-itruns the container in interactive mode with a TTY attached.-v "$(pwd):/work"mounts the current host directory into the container at/work.nrel/docker-urbanopt:1.1.0is the Docker image containing URBANopt version 1.1.0 and its dependencies.uo runinvokes the URBANopt CLI inside the container.-f example_uo/example_project.jsonspecifies the URBANopt project definition file.-s example_uo/baseline_scenario.csvspecifies the scenario CSV used for the run.example_project.jsonandbaseline_scenario.csvare example files provided by URBANopt- User projects will typically use different filenames
- URBANopt CLI usage and workflows are unchanged from a native installation
Simulation Outputs
Because the project directory is mounted into the container, all outputs are written directly to the host filesystem.
For example:
/work/example_uo/run/
maps to:
your-urbanopt-project/example_uo/run/
No results are stored only inside the container.
Parallel Execution
The number of parallel URBANopt simulations is controlled in project config file runner.conf:
num_parallel = 10
The container uses the CPUs available on the host VM. No special Docker configuration is required on Linux-based cloud instances.
Troubleshooting and Monitoring
- Use
docker logs <container-id>to inspect container output if running without-it. - Check
example_uo/run/logs/for OpenStudio and EnergyPlus logs. - Monitor CPU and memory usage on the VM during large runs to ensure adequate resources.
Option 2 - Connecting to an OpenStudio-Server instance via REST API
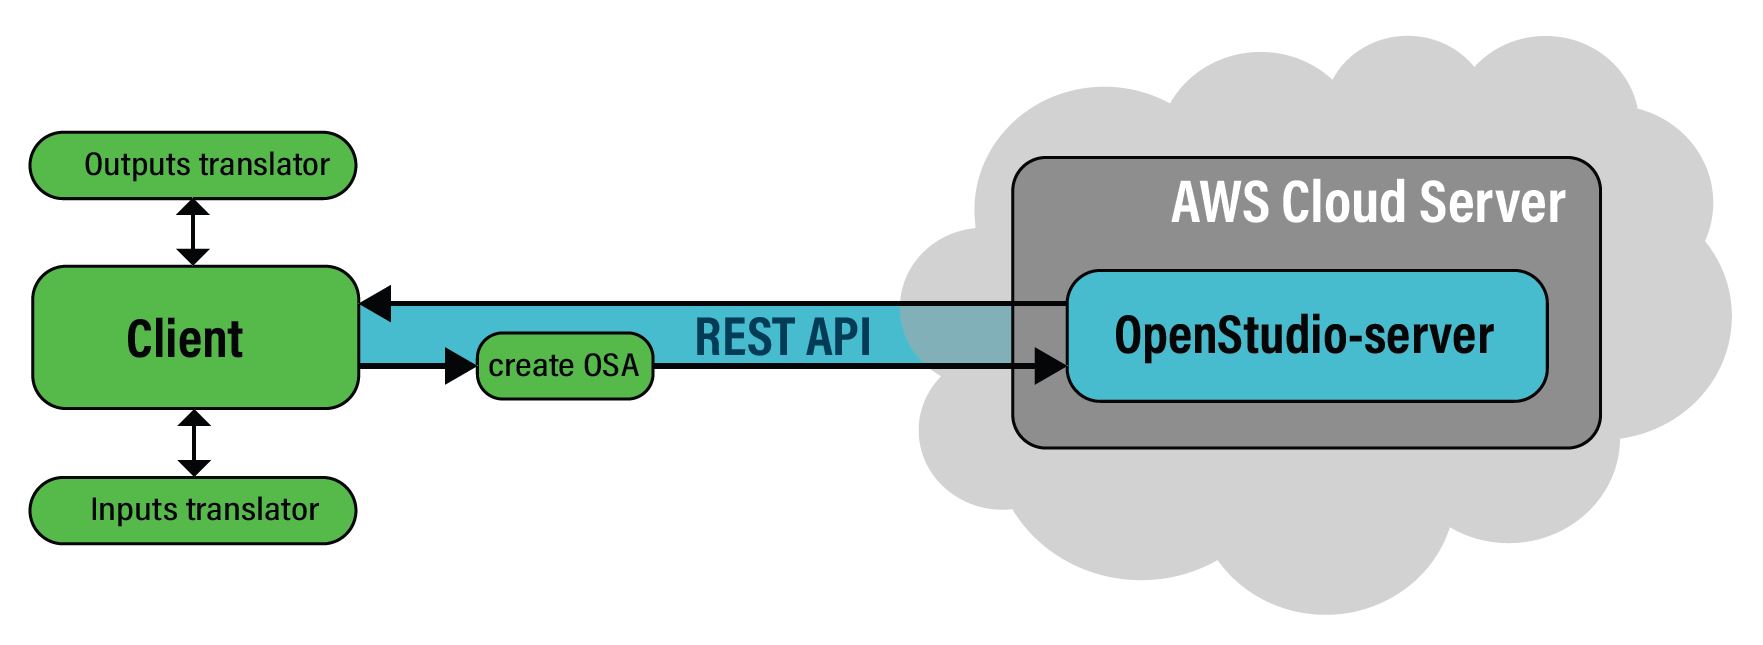
Figure 2 - Option 2: Connecting to OpenStudio server through REST API
Another option is to use the OpenStudio Analysis Framework (OSAF), also called OpenStudio-server. This approach is useful for applications that are running on serverless computing environments (e.g. AWS Kestrel) that do not have a way to install URBANopt locally.
OpenStudio-server is a web-based application that runs OpenStudio Analysis workflows as well as URBANopt workflows. It provides a REST API to process workflows and run simulations in the cloud. OpenStudio-server can be deployed using a Kubernetes Helm chart and works with most cloud providers’ Kubernetes stacks such as AWS Elastic Kubernetes Service (EKS). Once deployed, your application client can make REST HTTP requests to the OpenStudio-server without having to run it locally. For details on how to install OpenStudio-server and set up cloud deployment, please consult README.md. For information on how to run an URBANopt workflow using OpenStudio-server, please consult this example Jupyter notebook.
After deploying an OpenStudio-server instance, you can create an OSA folder (OpenStudio Analysis folder), which is a zipped folder that includes an URBANopt project packaged to run via the OpenStudio server. After creating the zipped folder, you can send requests to the OpenStudio-server via the openstudio_meta CLI (openstudio_meta ships with Openstudio-server: https://github.com/NatLabRockies/OpenStudio-server/blob/develop/bin/openstudio_meta) which includes a function that sends REST HTTP requests to run the analysis in the OpenStudio server.
This Jupyter notebook demonstrates an example of creating the OSA zipped folder and sending a request to run the URBANopt analysis via the openstudio_meta_cli. To run the Jupyter notebook you can create a ruby kernel and follow these general steps to install the necessary dependencies to run the commands with the openstudio_meta.
-
Install rest-client in your ruby gems:
gem install rest-client -
Install PAT to have access to the openstudio_meta CLI and all gems necessary to run it (install directory on windows is C/ParametricAnalysisTool-3.5.0).
-
Start an OSAF server cluster on AWS, Google, Microsoft, etc. using the Helm charts. Note the server IP address (referred to as the HOST in the notebook); you will need it to submit the jobs.
The command to run the analysis is as follows (you will need to replace the values in angle brackets (< >) with your values):
<path/to/openstudio-meta> run_analysis --debug --verbose <path/of/ URBANopt_template.json> <Server IP address> -z <name_of_zipped_folder> -a single_run
For example:
C:\ParametricAnalysisTool-3.1.0\pat\OpenStudio-server\bin\openstudio_metarun_analysis --debug --verbose 'C:/create_URBANopt_OSA/URBANopt_template.json' 'http://10.40.18.67' -z 'URBANopt' -a single_run
Once the job is submitted, you should be able to see the analysis status and the results on the Server Web Interface that you created. Note: The user can choose to recreate the functions that send REST HTTP requests in any coding language they want instead of using openstudio_meta CLI, which is in Ruby language. The details of the ruby based client that contain the REST API functions (e.g. new_analysis, run_analysis, download_datapoint) can be found in the OpenStudio Analysis Gem. The openstudio_meta -CLI tool makes uses of that API.
Preparing URBANopt project inputs via an Inputs Translator
To streamline the creation of URBANopt inputs, a translator will first need to be developed. The translator should generally include methods that map project details defined in the commercial software platform to URBANopt inputs as outlined in the following sections. To see an example of an URBANopt project directory structure you can run the CLI to create a URBANopt project. A example project directory is also provided in the example project repository. It is recommended that users refer to the following tutorials to understand more about URBANopt required files and their structure: Project Creation and GeoJSON File Tutorial and Scenario Creation and Run.
Create a valid initial GeoJSON file
The first input of URBANopt is the Feature File which represents a selected set of features for analysis and is in GeoJSON is a widely used format for encoding geographic data. For example, GeoJSON supports representing points, LineString, and Polygon. Geometric objects with additional properties are Feature objects and sets of features are contained in FeatureCollection objects. The GeoJSON schema should be followed when creating a GeoJSON file.
Add project-level features to the GeoJSON
After creating the GeoJSON file structure, project-level features can be added to create an URBANopt GeoJSON file. Project-level features are properties that are applied to all the features in the URBANopt GeoJSON file. These properties include top-level inputs such as the simulation timestep, the weather file name, and the climate zone. The schema for these properties is defined in the site properties schema.
Add a building feature to the GeoJSON
The next step is to add building features to the GeoJSON file according to the building properties schema as a guide. This schema describes (A) the required and optional inputs for representing buildings in the GeoJSON file and (B) the format/type that these inputs should follow.
Extracting and storing the Weather File
Methods can be created to extract a valid weather file and store it in the directory named “weather”. The required files that should be extracted are the epw, ddy, and stat files. The example URBANopt project uses weather files for Buffalo NY. Additional weather files can be found on the EnergyPlus Website. The translator could have the functionality to connect to the website and download identified weather files or parse them from a weather database if it exists. The weather file can then be saved in the weather directory at the top of an URBANopt project directory to be utilized in the simulation.
Reading URBANopt Outputs Via an Outputs Translator
After running the analysis, the URBANopt output results can be found in the URBANopt project directory, which will follow according to the URBANopt reporting schema. For more information about URBANopt outputs refers to the URBANopt Results Processing tutorial. The client can create a translator that processes these result files and maps them back in a specific format to be displayed on the client’s platform.